|
How to connect to RV Park sewer
line
|
|
Staying at a RV Park comes with
paying a fee and provides you with access to water,
electric and sewer connection. There is a right way
and a wrong way to connect your RV to the sewer
line. Sadly over the years there has been a lot of
wrong information about the correct way to connect
to the sewer line. With over 15 years (5,500+ Days)
of full time rving, all over America, the publishers
would like to provide you with the correct procedure
for connecting to the RV Park sewer
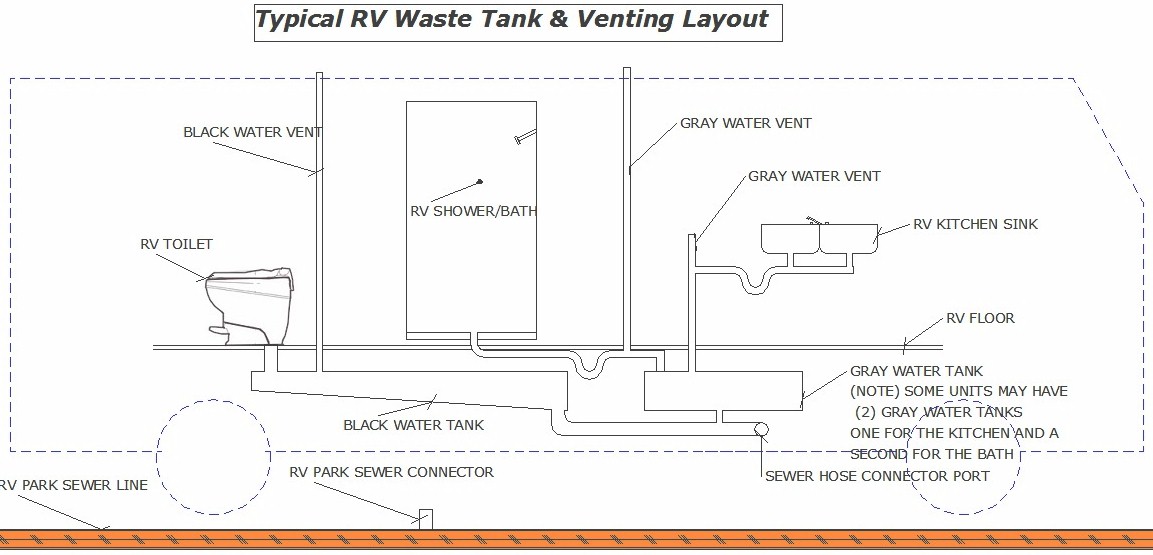
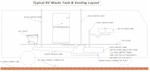
line. This page contains detail information about
your RV waste disposal system along with many
FAQ's. Click here for an
illustration of a
typical RV Waste System.
|
The Right and Wrong way to
connect
|
|
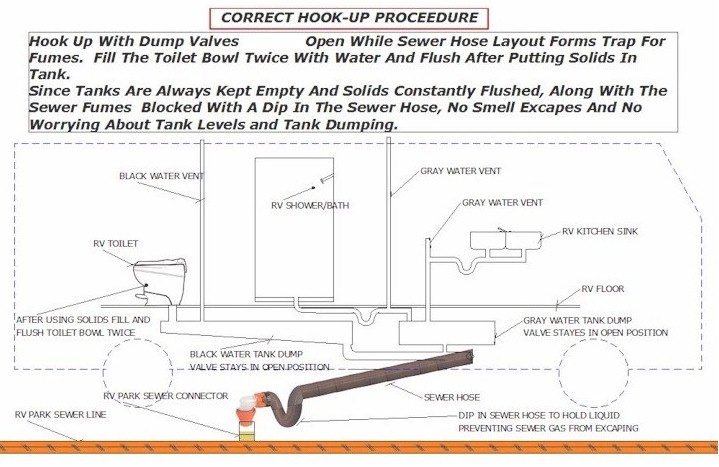
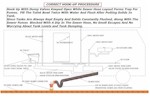
The Right Way to Connect
Click for
illustration |
1.
Connect sewer hose to RV
park sewer connection with a
dip in the hose providing a
sewer vapor block. Click
here for illustration.
2. Open
both the black and gray
water discharge valves.
3. When
putting solids into the
toilet, flush and then fill
the toilet bowl twice (2
times) to the top with water
and flush. The force of
these (2) flushes will push
all the solids out of the
black water tank into the
parks sewer line, stopping
any vapors going up the tank
vent. Click here to learn
more about
filling the toilet bowl.
4. Sit
back and enjoy your stay
knowing that you are not
providing smelly fumes over
to your neighbors.
Click here for
frequently
asked questions (faq) |
|
|
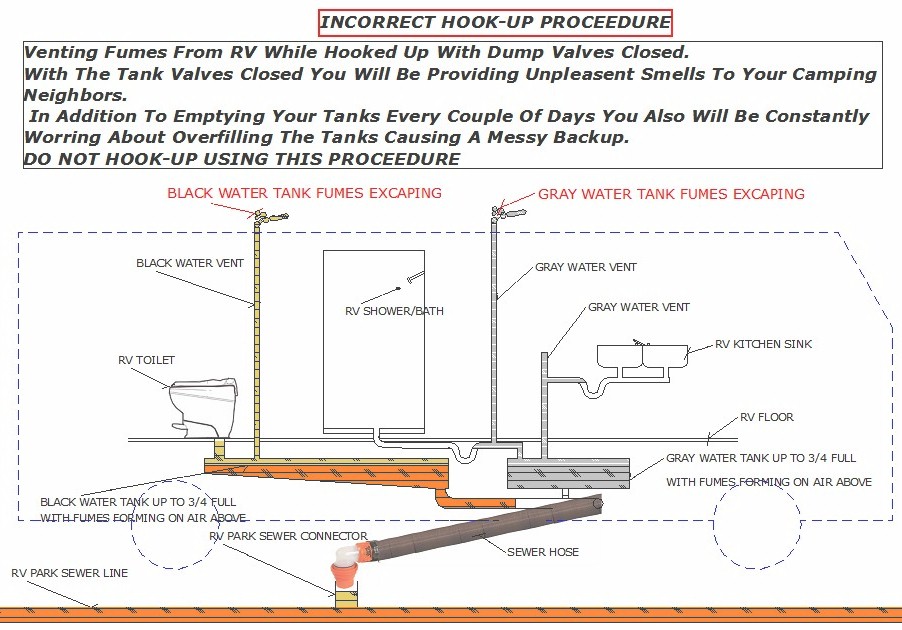
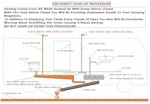
The Wrong
Way to Connect
Click for
illustration |
1.
Connect sewer hose to RV
park sewer connection
without any dip in the sewer
hose.
2. Keep
the black and gray water
discharged valves shut.
3.
Constantly monitor tank
levels until 3/4 full.
4. When
tanks are 3/4 full open both
black and gray water
discharge valves. Flush the
black water tank. If your RV
is equipped with an external
flush inlet. If no flush
inlet is available insert a
hose, through the toilet,
and flush the black water
tank.
5. Sit
back and worry about having
to empty your tanks every
other day and also wonder
where those smells are
coming from.
Click here for
frequently
asked questions (faq) |
|
|
|
|
Typical RV Waste System
Click image to
expand in new window |
Correct Way to Hook-up
Click image to
expand in new window |
Incorrect Way to Hook-up
Click image to
expand in new window |
 |
 |
 |
|
| |
|
|
|
UTILIZING YOUR RV TOILET TO MAINTAIN AN
ODOR FREE BLACK WATER TANK |
The correct way to hook-up your RV waste
disposal system to the RV Parks sewer system has
been stated above but to review.
1.
Connect sewer hose to RV
park sewer connection with a
dip in the hose providing a
sewer vapor block. See the
illustrations above.
2. Open
both the black and gray
water discharge valves.
3. When
putting solids into the
toilet, flush and then fill
the toilet bowl twice (2
times) to the top with water
and flush. The force of
these (2) flushes will push
all the solids out of the
black water tank into the
parks sewer line, stopping
any vapors going up the tank
vent.
As mentioned above, the toilet must be filled
completely twice with water and flushed. Along
with the weight and volume of water this action will
push the solids and fumes out and down through the
RV Parks sewer system. Depending on the make and
model of your RV toilet, it may hold from 3 to 6
gallons of water when filled. This volume and weight along with
the force of gravity is what cleans out your black
water tank.
There are 3 primary ways you may use to fill your RV
toilet bowl with water.
1. Fill a bucket from your sink and pour the water
into the bowl. This process is cumbersome and takes
time to do.
2. Depress the RV toilet flush pedal part way down
until water enters the bowl and the toilet bottom
opening has yet to open. This process is slow
and will prematurely wear out the spring system that
operates the flush pedal.
3. Install a secondary water line next to the toilet
utilizing a simple kitchen sink spray hose. The
spray hose will rapidly fill the bowl along with
keeping the bowl clean. Installing this system is
fairly simple and only takes a couple of hours.
We have outline the installation process below along
with illustrations.
|
|
|
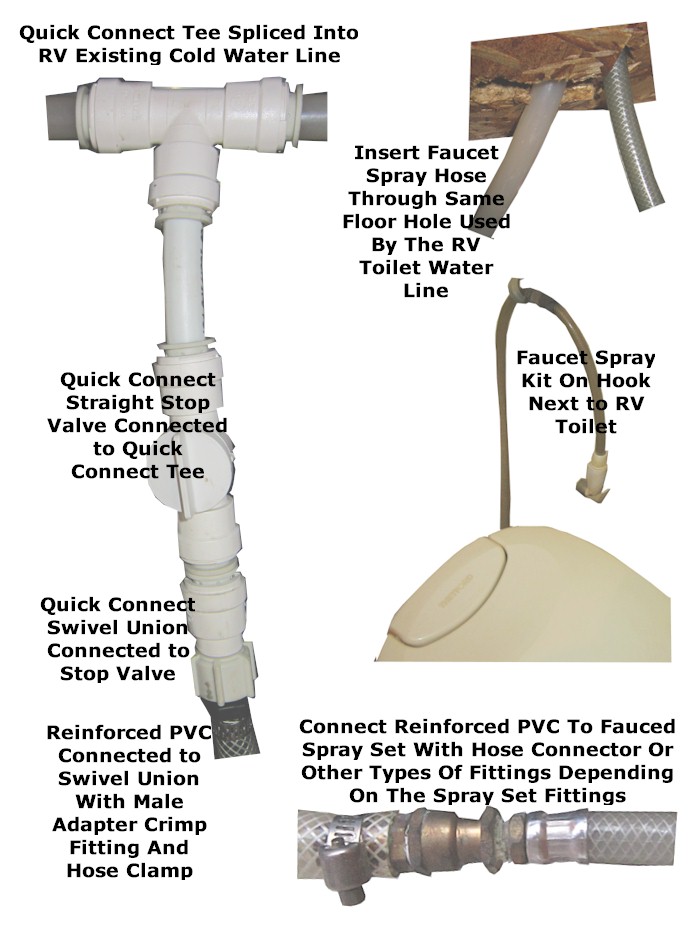
Installing a RV Toilet Filling and Cleaning
System |
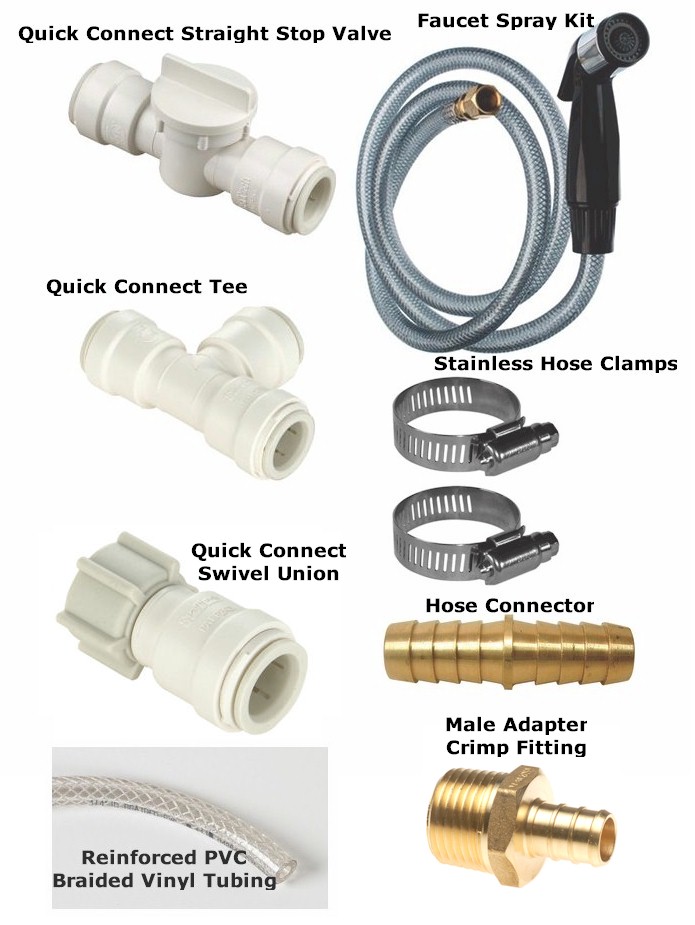
Parts List Diagram
Click
image to enlarge in new
window |
 |
|
Parts Assembled
Diagram
Click
image to enlarge in new
window |
 |
|
|
|
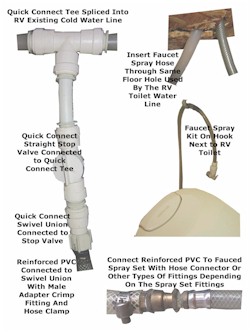
Parts List (Get connectors that are
the same size as your RV water line)
|
(1) Quick Connect Straight Stop
Valve
(1) Quick Connect Tee
(1) Quick Connect Swivel Union
(1) Reinforced PVC Braided Vinyl
Tubing
|
(2) Stainless Hose Clamps
(1) Hose Connector(1) Male Adapter Crip Fitting
(1) Kitchen Faucet Spray Hose |
|
Step 1. Locate the
RV water line that connects to the toilet.
Step 2. Insert the Spray
hose connector end down through the same
hole that is used by the water line to the toilet.
Step 3. Decide where it
will be convenient to place the Quick
Connect Tee into the water line.
Step 4. Assemble all
parts as per the diagram using enough PVC
tubing as to reach the area you will connect
the Tee to the water line.
Step 5. Connect the
Quick Connect Tee to the RV water line.
Step 6. Test system for
any water leaks. |
|
|
|
| |
|
|
Frequently Asked Questions About RV Sewer
and Waste Systems |
Should I
always use that expensive RV & Camping
toilet tissue.
If you are connected to
a RV Park sewer line you can use any brand
that is comfortable to you. If you are
holding your waste in the tank, such as
traveling or dry camping, use the expensive
stuff.
I've stayed at
RV Parks that say don't connect with the
tank valves open as they are on a limited
septic system.
This is a common question and we answer it
this way. What if you were checking into a
motel/hotel and after paying the clerk said
"please only flush twice a day as we have a
limited septic system". Would you stay
there? If a RV Park is charging you
for full service without providing an
adequate sewer system for its guest
maybe its time to stay somewhere else.
What do I do if my black water tank
is stopped up and will not drain.
The problem you have is the toilet tissue in
the tank has surrounded and plugged up the
tanks drain hole. Remember toilet tissue
will sink to the bottom of the tank and is
made from wood and when it dries out it gets
very stiff. To clear out
the drain hole:
1. Use an item called "Termination Cap
with Bayonet Hook and Hose Thread Connection".
You should also have a Gate Valve installed
just behind the Termination Cap. These items can be purchased
at the top of this page or at most RV parts
stores. You place this cap on the RV
drain outlet and attach a hose to the hose
threaded connection. After connecting open
the black tank drain valve. Turning on the hose
causes water to fill the drain tube and
applies pressure to the underside of the
black tank drain hole pushing upward into
the tank. This should remove the stoppage.
Close the tank valve and attach your sewer
hose to drain the tank. Put a bucket under
the outlet prior to removing the cap to
capture any waste that is in the drain tube.
Do I need to put chemicals in my black water
tank?
If you are traveling or dry camping with the
tank valve closed, yes use one that will
dissolve the solids and help with the odors.
If you are correctly
hooked up to a RV Park sewer system you
will not need any chemicals.
I've hooked up my RV sewer system as
per the instructions above and I'm still
getting a sewer odor.
Check that your sewer hose is on a downward
slope toward the RV Park sewer outlet and
that you have placed a dip in the hose just
before the Park's sewer outlet. There must
always be liquid in this dip to prevent
fumes from traveling up the sewer hose. If
you are still getting fumes after this it is
probably coming from your neighbors. You may
want to instruct them on the correct hook-up
procedure.
My wife uses tissue on every visit
to the toilet. What should we do?
Unless the toilet visit involves solid waste
we would suggest that the used tissue be
disposed of in a separate receptacle. You
will also only need to flush the toilet and
not fill it twice as with solid waste. Men,
always remember to put the seat down after
use.
It appears that your sewer hook-up
procedures waste a lot of water.
First off water is never wasted, it is used.
Second the amount of additional fuel you use
while pulling or driven your RV is wasted,
never to return. Your toilet at home uses
the same amount of water no matter if your
flushing solid or liquid waste. Our hook-up
procedure only uses additional water when
solid waste are involved.
My RV Toilet needs to be replaced.
Should I have it replaced at the shop or
could I do it myself?
Since you own an RV you must be somewhat
handy with tools and fixing things. So yes
you can replace it yourself and it is not a
difficult job. First off buy a replacement
RV Toilet that is similar to the one you
have. If you want to upgrade to a more fancy
unit make sure its dimensions and water
connections will fit in the same space as
your current toilet. To replace the toilet
do the following:
1. Turn off the RV water and disconnect the
water line located behind the toilet.
2. The toilet is connected to the floor by
two bolts. The bolts can be found by
removing the plastic covers located on the
base of the toilet. Remove both nuts.
3. Remove the thick rubber gasket from the
hole beneath the toilet.
4. Insert the new rubber gasket that came
with your toilet.
5. Position the new toilet over the rubber
gasket and connector bolts. Tighten the nuts according to the
directions. Cover the bolts with the plastic
covers provided with the new toilet.
6. Reconnect the water line to the back of
the toilet.
7. Enjoy your new RV Toilet.
|
|
|
|
|